The Editor
Node Tree and the Editor
Heron’s GUI is one of the two hearts of the framework (yes, Heron is a beast with two hearts, the other being whatever tool one uses to write the code for the different Nodes).
The Heron GUI (see Figure 1) has three main regions, the Menu Bar, the Node Tree and the Editor. The Node Tree is where all the Nodes available to Heron are represented as buttons. Pressing one of these will add the corresponding Node to the Editor The Node Tree is populated automatically by reading the Operations folder of the Heron code base.
The Editor is where a user, having loaded all required Nodes connects them with Links and sets the parameters in them.

Figure 1.
Node Window
Each Node is represented in the Editor as a Node GUI (see Figure 2). The Node GUI is separated in four regions from top to bottom. The top is the Name of the Node. This is colour coded to denote the type of Node. Double clicking on the Node name will open the Node’s code (com and worker scripts) in the IDE of choice.
The second down is the Node’s Controls region. This is populated by four buttons: The Network, the Save, the Info and the Delete. The Network button will open the Network Menu where one can fill in the local and remote servers and the paths to the used python and worker script executable (see Setting up and using multiple machines). The Save button will open the Save Menu where one can fill in the paths to the com log and worker save substate folder (see All about the Nodes, Debugging and The Saving State System). The Info is a toggle button that when on allows viewing of the Node’s tooltips when the mouse is hovered over the corresponding region. Finally the Delete button will delete the Node from the Editor and the Graph (like the Del keyboard button).
The third region down is the Parameters region. This is where the user will fill in the parameter values for the Node. The parameters are live, that means that when the Graph is running (that is, all the Nodes are running their com and worker scripts and the GUI cannot be used as an Editor), a change in the parameters in the GUI will propagate all the way to the worker script (even on another machine). It is up to the worker script of each Node to decide if it wants to do something with that (see Writing new Nodes)
The fourth region is the Inputs/Outputs regions where the Node offers connection points to link to other Nodes.

Figure 2.
Menu Bar
The Menu Bar has three drop down menus (see Figure 3). The File menu offers the New, Load and Save buttons that do exactly what you’d expect them to do. The Edit menu offers two items, the Edit IPs/ports and the Settings.
The Edit IPs/ports opens Heron’s SSH Info Editor (SIE) where one can specify the different machines on the network accessible to Heron (see Setting up and using multiple machines). The Settings entry will open the Settings window where the user can edit the different Settings of Heron.
Finally the Nodes button offers the options Add new Operations Folder (as Symbolic Link from Existing Repo), Download Operations from the Heron-Repositories page and Create New Node. The first option allows one to point to a repository on their hard disk that is structured to hold code for one or more Heron Nodes and add a symbolic link of this code to the appropriate place in the Heron/Heron/Operations folder so that Heron’s Node Menu will see them as valid Nodes (see Adding Repositories as new Nodes). The second entry does the same thing but now asks the user for the URL of an online repo and uses git to clone this locally (where the user points to) and then adds that repo to the Operations folder just as the first option above. Finally the third option start the process of creating a new Node using Heron’s GUIs.
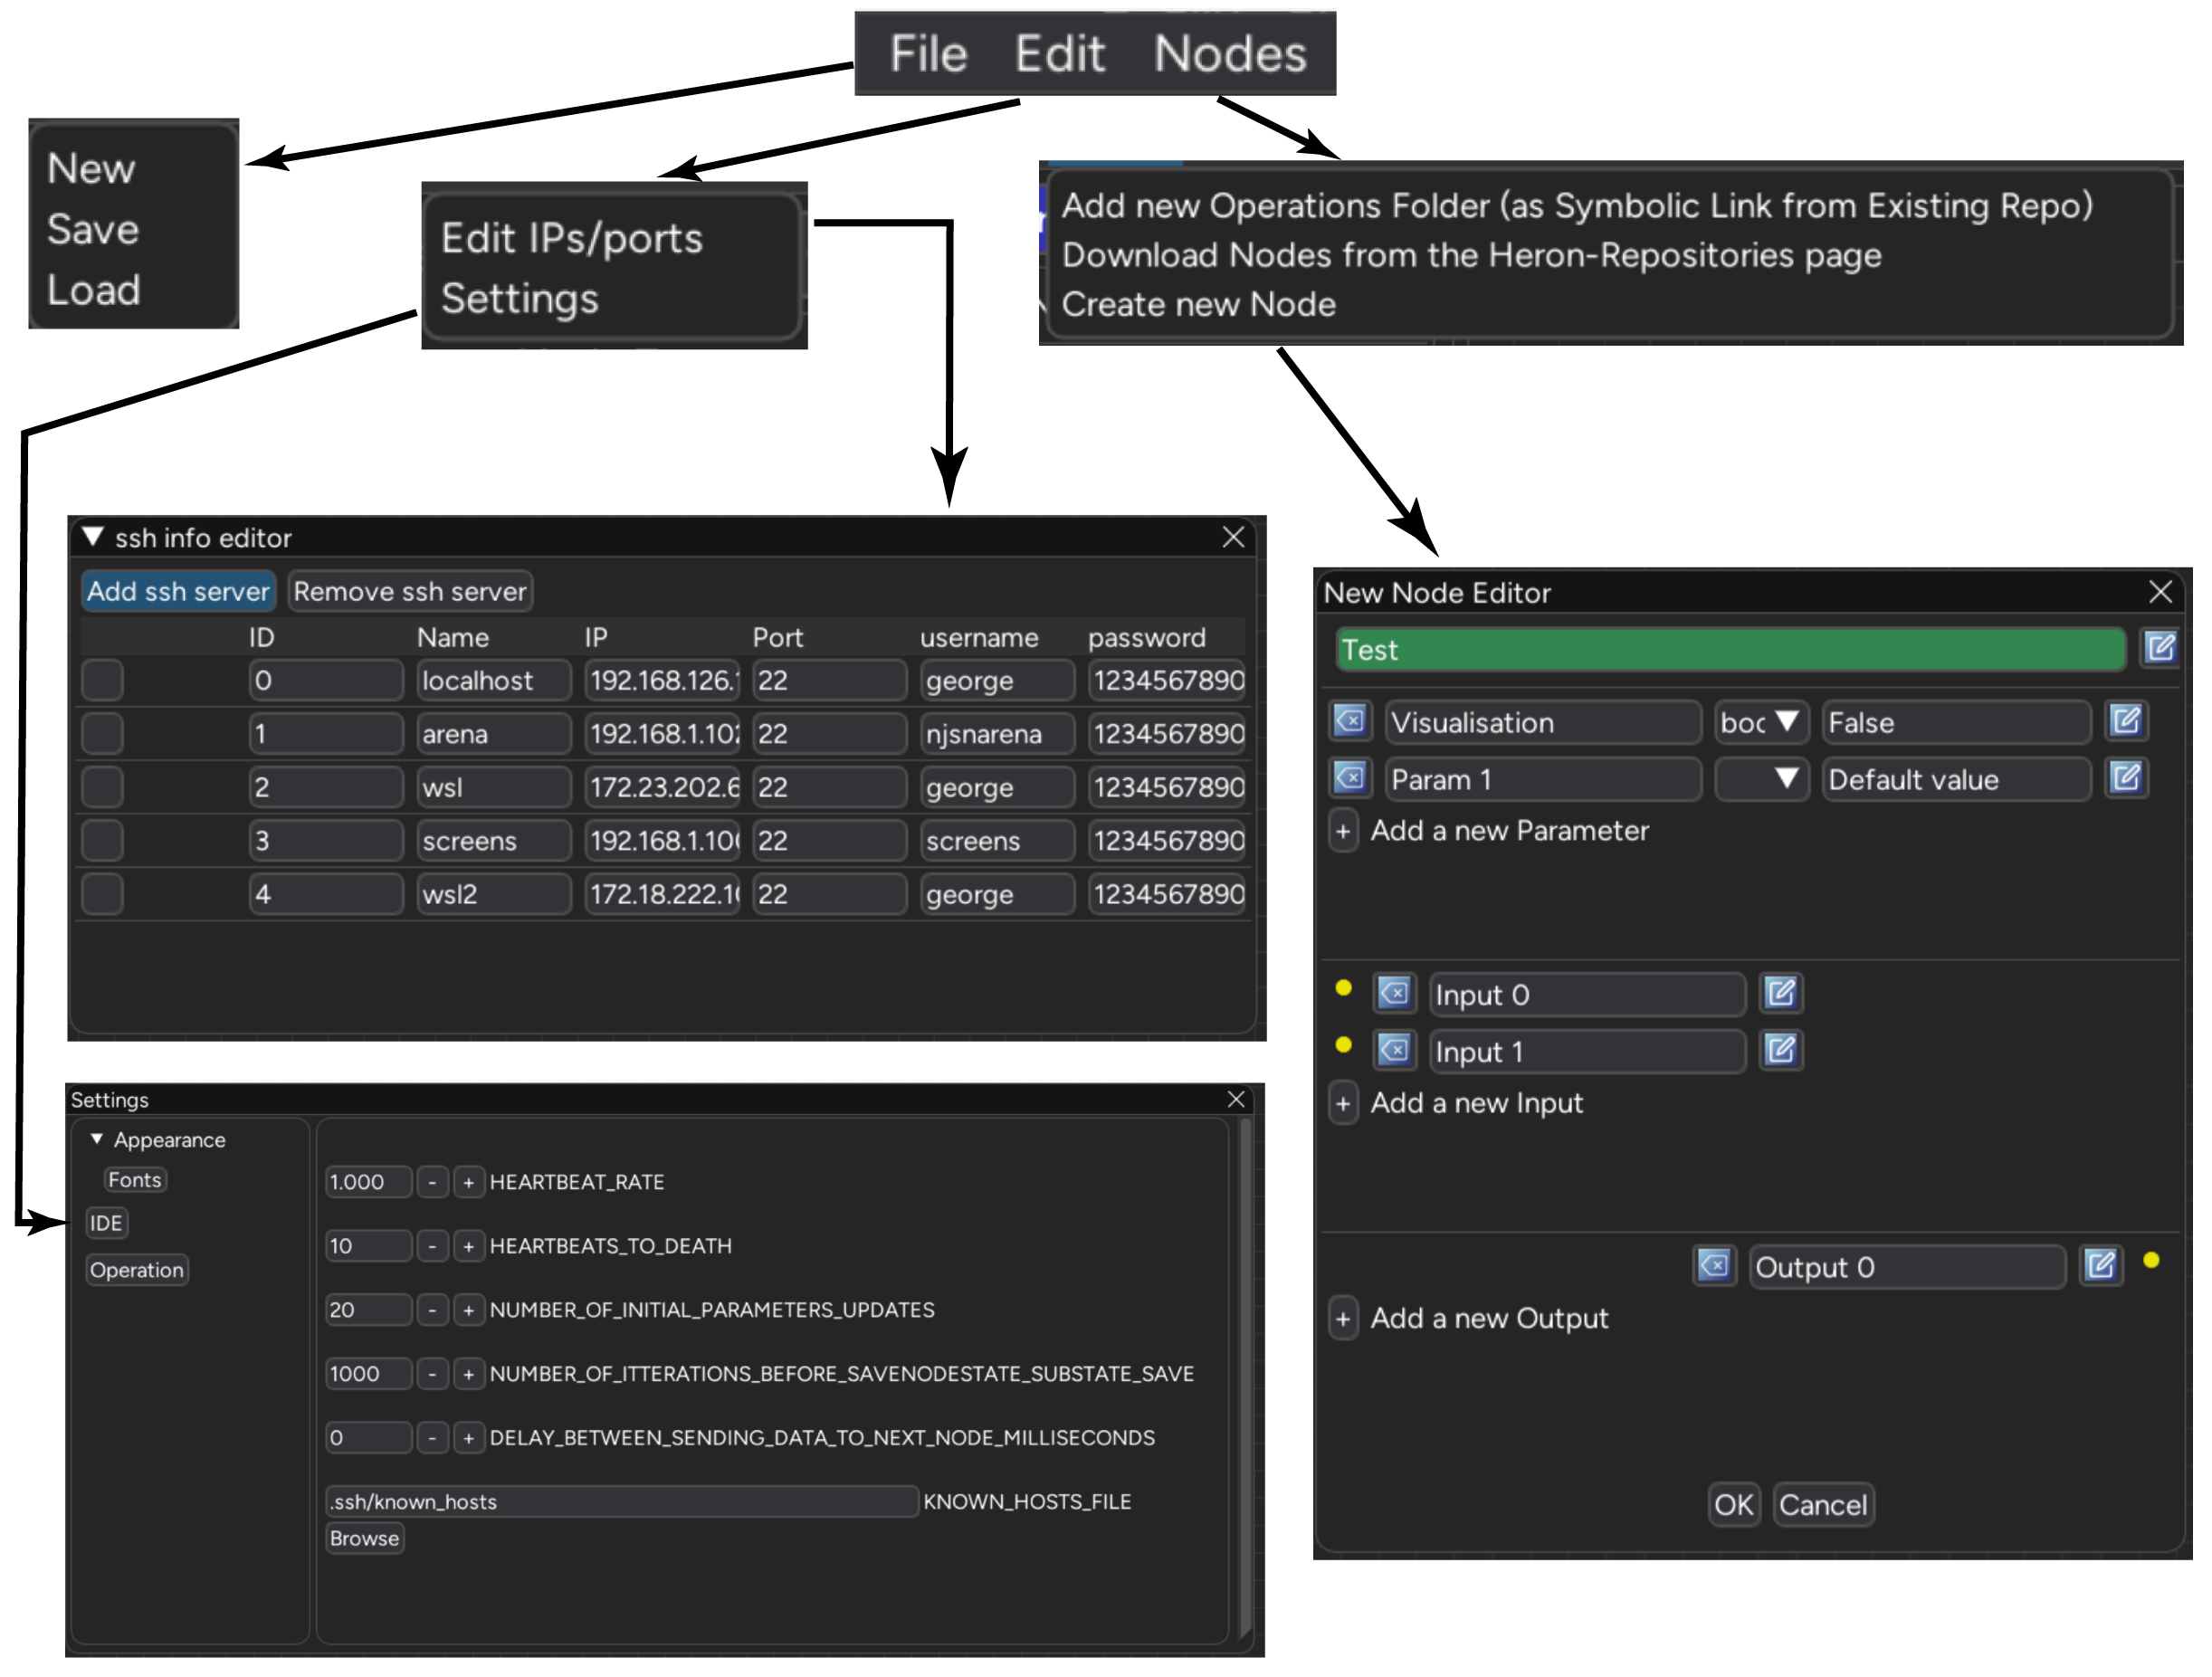
Figure 3.
Settings
The Settings window allows the user to control certain aspects of Heron. It currently offers three Options, the Appearance, where the font types and sizes for the Editor and the Nodes can be set, the IDE where a user can set the path to the IDE they use to develop code (and the path to a project that code is connected to if there is one) and the Operation where the user can set a series of Heron variables that control the way Heron connects its Nodes and passes messages around.
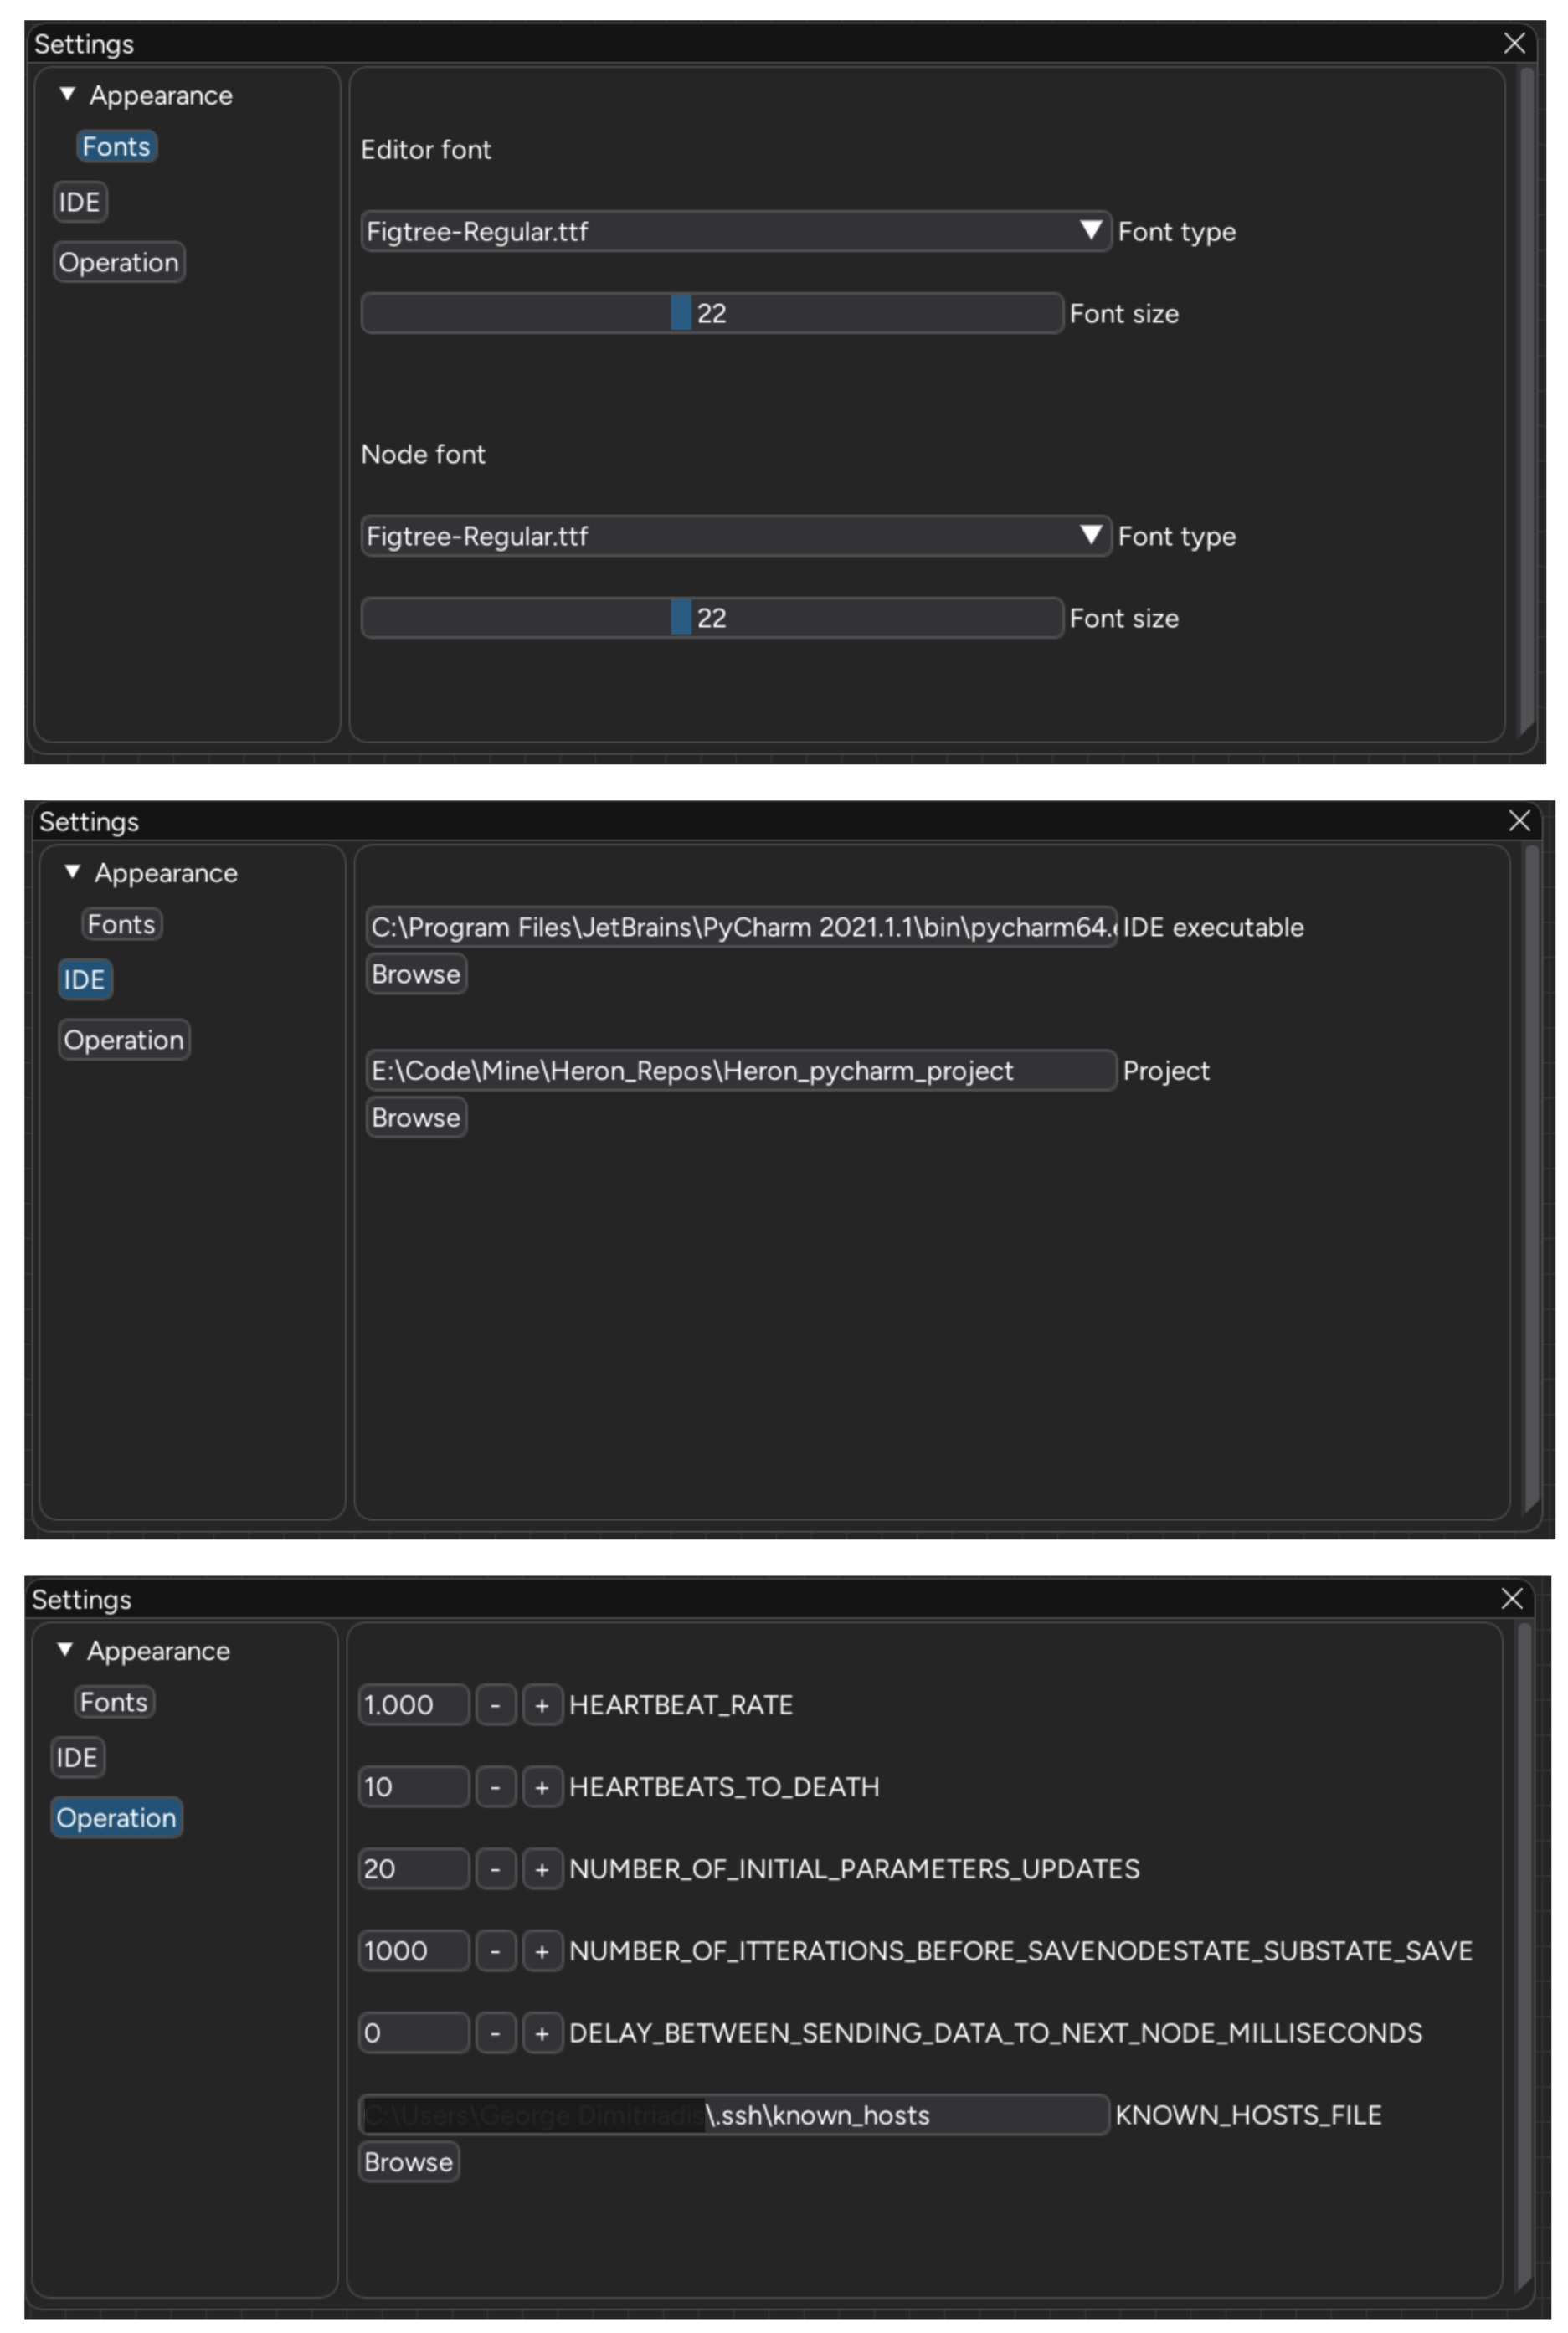
Figure 4.
Having set the IDE (and potential project) path will allow Heron to open up the code of a Node in that IDE when the user double clicks on the title bar of a Node. It will also allow Heron to open the auto-generated scripts in that IDE when the user uses Heron’s GUI to create a new Node.
The variables in the Operation option have been described in different parts of the documentation: HEARTRATE and HEARTBEATS_TO_DEATH in the paragraph above, the NUMBER_OF_INITIAL_PARAMETER_UPDATES in All about the Nodes, the NUMBER_OF_ITTERATIONS_BEFORE_SAVENODESTATE_SUBSTATE_SAVE in The Saving State System, the DELAY_BETWEEN_SENDING_DATA_TO_NEXT_NODE_MILLISECONDS in All about the Nodes and the KNOWN_HOSTS_FILE in Installation & Startup.