All about the Nodes
A Node in Heron is a word of many faces. It is used interchangeably to mean either the two processes that are responsible for executing a certain functionality and communicating with other Nodes (so the Actor in the Actor-based architecture that Heron defines), or the little Node GUI in Heron’s Node Editor representing this functionality and giving access to the worker script’s state through its Parameters user inputs. It can also be used as a synonym of the folder structure that holds the text based code that Python interprets into this functionality. In most cases the meaning is pretty clear from the context in which the word is used.
So a Node is an amalgam of a group of graphical elements, a corresponding folder structure, a set of necessary and sufficient Python scripts in that structure and the two processes that run when Python interprets those scripts.
The connection between the graphical elements representing a Node, the Node’s scripts and the processes that are the functional part of the Node can be seen in Figure 1.
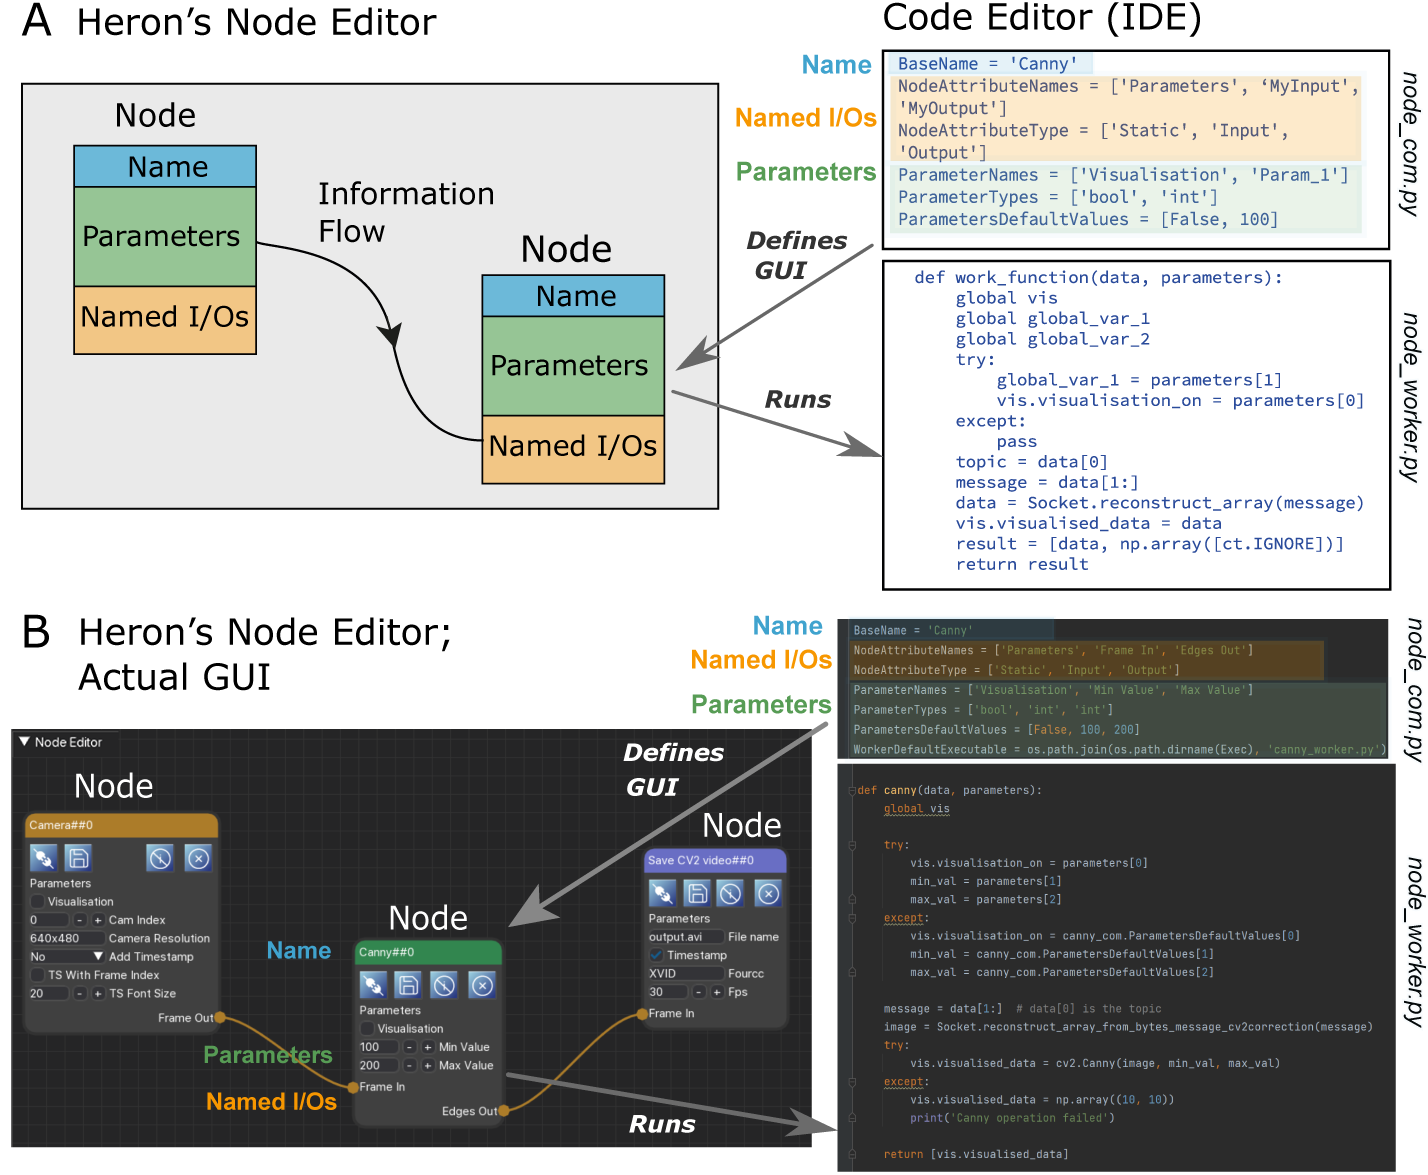
Figure 1. A. A schematic describing the basic idea of the correspondences between a Node’s GUI, the com script that defines this, the Node’s functionality / processes and the worker script that defines those. B. A simple example of a Heron pipeline showing fragments of code that define the Canny Node (both its GUI and its functionality).
The scripts
A thorough description of a Node’s folder structure can be found in Adding Repositories as new Nodes. Here we will explain what is inside a Node’s base folder (usually named using the Node’s name) and how the files found there work together to create the Node’s GUI and functionality.
Heron expects to see two scripts in the base Node folder. One named whatever_you_want_com.py and one whatever_you_want_worker.py. It is good practice to use the name of the Node to name those two files but Heron won’t mind. Other users of your Node might though. All that Heron will look for is for two python scripts that finish in _com.py and _worker.py. When Heron starts, it scans its Operations folder and creates Node buttons (see The Editor) for all folders in the subdirectories inside the Source, Transform and Sink folders assuming that each one of these Node folders has a xxx_com.py and a xxx_worker.py script. The xxx_com.py script will help Heron create the Node’s GUI when a Node button is pressed and a Node is added to the Node Editor window. The xxx_worker.py will be called by Heron when a Graph has started.
The _com script is heavily prescribed by Heron and a Node developer is allowed to only change the values of the predefined variables in it. On the other hand the xxx_worker.py script is there for the Node developer to complete and Heron only expects two required functions, the one to be defined as the worker_function and the one to be defined as the end_of_life function. Heron can also deal with one optional function, to be defined as the initialisation function. For more details on how Nodes are composed through the xxx_com.py and xxx_worker.py scripts see Writing new Nodes.
The Node types
Heron understands three types of Nodes, Sources, Transforms and Sinks. The main difference between them is the inputs and outputs they are allowed to have. Sources generate their own data and can only have outputs (no inputs). Transforms take data from other Nodes into their inputs and, well, transform them, sending the transformed data out to other Nodes through their outputs. So they have both inputs and outputs. Finally Sinks are meant to take data from previous Nodes in the pipeline and do something with them without passing them further on (so, no outputs).
Creating a Graph (Pipeline)
To create a pipeline ones does the pretty obvious. Presses the Node buttons that the pipeline requires, connects the Nodes that have now appeared on the Node Editor window (by connecting an output of one Node to an input of another) and finally sets the parameter values for the different Nodes (don’t forget to save). That’s it. Well, there is also the issue of telling the Nodes whose worker function is to run on another machine, where exactly that machine is (done through the Node’s secondary window as described in The Editor and Setting up and using multiple machines). But now that is it for real.
Running a Graph (a Node’s life)
Once a Graph has been constructed then one can press the Start Graph button which will do two things. First it will stop Heron from acting like a pipeline editor (no Nodes can be added, deleted or (dis)connected). Second it will go through all the Nodes in the Node Editor window and (in order of addition to the window) it will start their respective xxx_worker.py scripts. That means that Heron will first check to see if an initialisation function is defined in the xxx_worker.py script and if yes it will call it, and keep calling it until it returns True. If there is no initialisation function or when it has returned True, Heron will pass the parameter values from the Node’s GUI to the xxx_worker.py script and then, well it depends on what type the Node is.
For Source Nodes, Heron will call the worker_function in the xxx_worker.py script once. This assumes that the function is an infinite loop that generates data and deals itself with passing those to the com process of the Node (this is much simpler than it sounds and you can see how it is done in Writing new Nodes).
For Transform and Sink Nodes Heron will call the worker_function of the xxx_worker.py script as a callback every time that new data have arrived in the Nodes inputs. The worker_function of these Nodes is expected to return a list of numpy arrays, each array corresponding to one of the Node’s outputs, which Heron will deal with from that point on (again see Writing new Nodes).
Before the worker function is called for the first time Heron will establish a connection between the worker process and the Heron one. That involves checking that the parameters set in the Node GUI can pass in the worker process ( and thus be seen by the worker function). Heron tries to establish this connection by trying run the initialisation function of the worker script until it gets a True return of up unitl it has tried NUMBER_OF_INITIAL_PARAMETER_UPDATES times (which comes first). If it fails, it stops trying to communicate and allows the worker process to kill itself. If it succeeds it then runs the worker function for the Source Nodes or establishes the callback functionality of the worker function for the Transform and Sink Nodes.
Heron will call the worker_function of a Transform or Sink Node if there are new data in AND the previous call has returned. If any new data arrive at the Node’s input and the worker_function from the previous call is still running then Heron will drop the new data which will be lost.
Warning
Heron has no buffer to hold any messages that come into a Node that is still processing its previous message. This is by design.
The logic behind the no-buffer feature is because in Heron’s use cases there is no situation where a Node would receive large amounts of data in bursts and very little data during the rest of the time (in which case a buffer would make sense). Nodes in most experiments will either be data intensive but with a constant or near constant data receiving speed (e.g. cameras) or will have variable data load reception but always with small data loads (e.g. buttons). The second case is not an issue and the first case cannot be dealt with a buffer but with the appropriate code design, since buffering data coming in a Node too slow for its input will just postpone the inevitable crash.
This design approach though means that Nodes can and will drop incoming packets silently. This is why Heron does not rely on packet order to tell which incoming packet in a Node corresponds to a Node’s state change or outgoing packet. To achieve this important time matching functionality Heron offers a number of debugging (see Debugging) and saving (see The Saving State System) tools that allow the user to know exactly which incoming packets never reached the Node and which generated packets were dropped by the next Node in the pipeline. This is described in more detail in Synchronisation.
The above fully defines what a Node does during an active Graph. Once the Stop Graph button has been pressed (or Heron is closed down) then all processes (the three forwarders and the com and worker processes for all Nodes) are killed (see below). At this point each Node will execute its on_end_of_life function taking care of any loose ends.
The Heartbeat System
While a Graph is running Heron sends every so often a message to all the Nodes telling them that all is fine and they should keep on operating. This is called a Heartbeat and the number of heartbeats per second is defined in the constants.py script (Heron/Heron/constants.py) as HEARTBEAT_RATE. It is by default set to 1 (message per second) but it can be changed by the user if needs be.
Each Node while running is also running on a separate thread a receiver of the heartbeat message. This thread keeps track of how long ago the last received heartbeat message was delivered to the Node. If this time surpasses HEARTBEATS_TO_DEATH seconds (also defined in the constants.py script) then the worker process of the Node calls its on_end_of_life function and then terminates itself.
This system allows the worker process that is running on a different machine to actually terminate without the com process that initiated it in the first place having to issue a kill command (which in the case of processes over different machines usually doesn’t work).
The HEARTBEATS_TO_DEATH is an important constant for a user to control (and eventually will be accessed through Heron’s GUI). It tells each Node how long it should wait without a heartbeat signal before it kills itself. There is a very important caveat to this system. In a Transform or Sink Node a heartbeat can be received only every time the worker_function is called (a Source’s heartbeat is received any time it is sent). If it takes the worker process to long to either initiate (e.g. because of a slow connection between machines when the Node’s worker process is running on a different machine) or the worker_function to actually run a single time then the worker process will terminate itself since the check of the time passed since the previous received heartbeat is done continuously. That means that for Transfer and Sink Nodes that are slower in their initialisation or worker_functions than HEARTBEATS_TO_DEATH * HEARTBEAT_RATE seconds the Node will always kill itself. The solution to this is to increase one of those two constants. These constants can have different values on different machines.
The inner workings
When a Graph is starting, the Heron GUI process will go through each of the Nodes in the Graph and will spun up a process. This is known as the com process of the Node. This always runs on the same machine as the Heron GUI and is responsible for the communication between Nodes. When the com process is up and running it will start a second process called the worker process of the Node. This runs the code that is in the xxx_worker.py script of the Node. The worker process will do the main work of the Node and will communicate with the com process in order to get any messages from other Nodes or send messages to other Nodes. The messaging between com processes is facilitated through another process called data forwarder and is done using the PUB SUB protocol of 0MQ.
There are two more communication pathways to be considered that deal with the communication between Heron’s GUI process and each of the Nodes’ worker processes. The first pathway deals with an initial messaging between the worker process and the Heron GUI process and is required so that the GUI process becomes aware when the worker process is up and running. The second allows the GUI process to send messages to the worker processes every time a parameter in the Nodes’ GUIs changes. Currently Heron does not allow the worker process of a Node to change the parameters shown on the GUI of the Node.
A schematic of all the processes and communication pathways between them can be seen in Figure 2B.
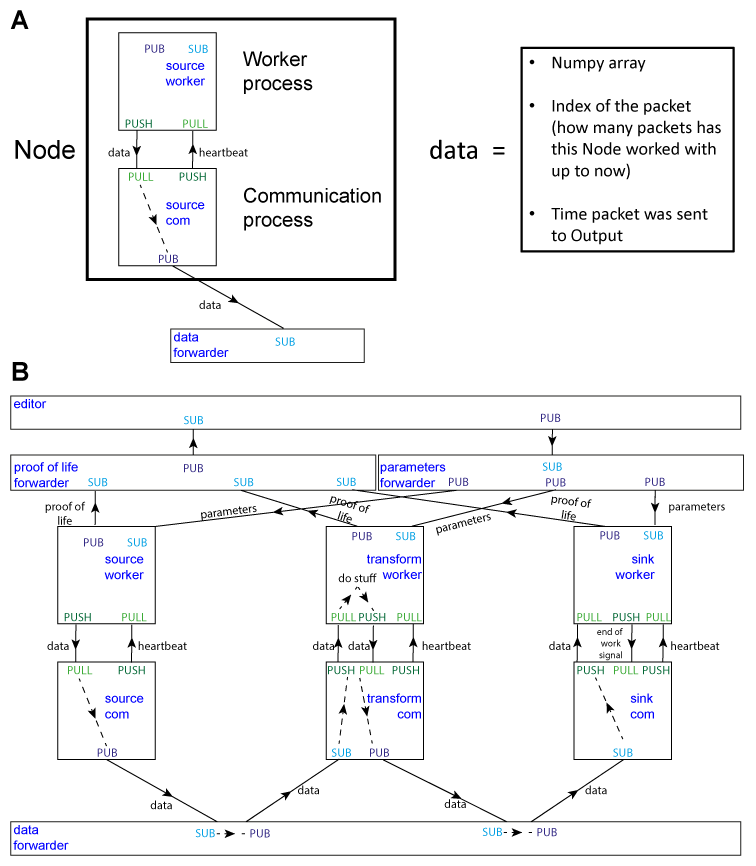
Figure 2. Heron’s design principles. A. On the right, Heron’s Node structure showing the two processes that define a running Node and how messages are passed between them. The design of the special message defined as ‘data’ is shown on the left. B. Heron’s processes and message passing diagram. Each rectangle represents a process. The top rectangle is the Heron process, while the two rectangles below that and the rectangle at the bottom of the figure are the three forwarders. The proof of life forwarder deals with messages relating with whether a worker process has initialised correctly. The parameters forwarder deals with messages that pass the different parameter values from the editor process (the GUI) to the individual Nodes. Finally, the data forwarder deals with the passing of the data messages between the com processes of the Nodes. The squares represent the worker (top) and com (bottom) process of three Nodes (a Source, a Transform and a Sink from left to right). Solid arrows represent message passing between processes using either the PUB SUB or the PUSH PULL type of sockets as defined in the 0MQ protocol. Dashed line arrows represent data passing within a single process.
Choosing the CPU core
Heron allows the user to choose the CPU a worker process of a Node will run on. The default is to allow the system to choose. This is not best practice though and often not constraining the worker process to a specific CPU will lead to increased overall resource usage and more importantly (at least in Windows) will also lead to a large amount of dropped packets.
Warning
If a Node seems to be dropping packages in either sending and receiving them, one of the first possible things to try (before much heavier code optimisation) is to lock the CPU the node runs in to a specific core. This often mitigates the problem, especially in Nodes that receive packages (Transforms, Sinks and Nodes that are running non Python code as a separate process). CPU locking though is not a panacea when it comes to package dropping and in certain cases might result in an increase of package dropping, so test your system and use appropriately.
Multiple Inputs / Outputs
Heron allows multiple Nodes to connect to a single input of a Node and a single output to connect to multiple Nodes. There is an exception to this rule. The Source Nodes can only connect each of their outputs to a single downstream Node.
The multiple outputs to one input functionality is straight forward and the messages that arrive in the worker function of a Node can be easily differentiated by their topic (which carries the name of the outgoing Node and the outgoing port).
The single output to multiple inputs is a bit more tricky. When this functionality is used (only valid for Transformer Nodes) one must allow enough time for the Node to duplicate its message and pass it to all the target Nodes. This is dependent on the hardware Heron runs on. To facilitate slower machines and/or large number of receiving Nodes Heron has a variable in its Settings called DELAY_BETWEEN_SENDING_DATA_TO_NEXT_NODE_MILLISECONDS. This by default is set to 0.2 ms. On standard machines this will allow Nodes to push their output to at least two downstream Nodes. For slower machines or more downstream connections one must set this number to a higher number. Of course the higher the number, the longer it will take the Transform Node’s worker function to return and be able to receive new packets from its upstream Nodes.